Back to article
3348
Using the Bose wireless transmitters
With the optional Bose wireless transmitter accessories, you can wirelessly connect your instrument or microphone to the system through the wireless receivers built in to Channels 1 and 2.
Wireless Transmiter Controls
The system is compatible with the following transmitter accessories:
Press the Power button.

When powered on, the power light glows solid white.
Auto-off timer: The auto-off timer conserves power when the wireless transmitter isn’t in use. The transmitter powers off when audio has stopped and you haven’t pressed any buttons on the transmitter for 30 minutes.

With the Bose Wireless Mic/Line Transmitter, you can change between mic and line input settings to match the source's input requirements. To do so, press and hold the Power and MUTE buttons until the transmitter icon on the channel display changes to reflect the new input setting.
NOTES:
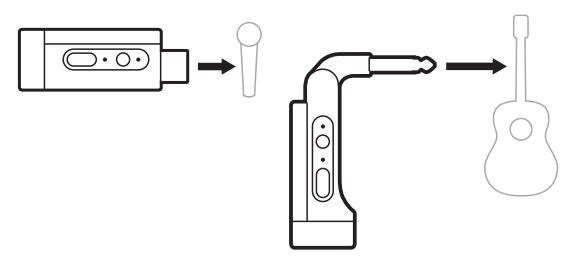
- Bose Wireless Instrument Transmitter
- Bose Wireless Mic/Line Transmitter
Powering ON the wireless transmitter
Press the Power button.When powered on, the power light glows solid white.
Auto-off timer: The auto-off timer conserves power when the wireless transmitter isn’t in use. The transmitter powers off when audio has stopped and you haven’t pressed any buttons on the transmitter for 30 minutes.
Pairing a wireless transmitter to channel 1 or 2
- If the system battery level is depleted, connect the system to power.
- Remove the cap from the wireless transmitter charging port for either Channel 1 or 2.

- Fully insert the transmitter into the charging port until you hear or feel a click, then wait 5 seconds for the transmitter to pair to that channel.

- The transmitter begins to charge.
NOTE: The transmitter can pair to only one channel at a time. To unpair the transmitter from the current channel and pair it to the other channel, insert it into the other channel’s charging port.
Connecting a paired wireless transmitter to an audio source
- Power on the system.
- Press and release the back of the wireless transmitter so it slides out of the wireless transmitter charging port. Remove it from the charging port.

On the channel display, a battery icon briefly appears to indicate the transmitter battery level.

- Connect the transmitter to your audio source.
- Power on the transmitter. After a few seconds, a transmitter icon appears on the channel display and the connection light on the transmitter glows solid blue to indicate that the transmitter is connected.

- If you’re using the Bose Wireless Mic/Line Transmitter, change between mic and line input settings if necessary to match the input requirements of your source.
Muting the wireless transmitter
Press the MUTE button to mute/unmute channel audio. When audio is muted, the connection light blinks blue.
Changing between MIC and Line Input
With the Bose Wireless Mic/Line Transmitter, you can change between mic and line input settings to match the source's input requirements. To do so, press and hold the Power and MUTE buttons until the transmitter icon on the channel display changes to reflect the new input setting.Connecting effects to a channel insert when using a wireless transmitter
When you connect a wireless transmitter to a channel which has the Insert setting set to "Auto," the 1/4" (6.35 mm) TRS channel input becomes a series channel insert (also known as an effects loop). You can connect effects units or pedals to the input using an insert cable, all while using your instrument or mic wirelessly.NOTES:
- An insert cable (1/4" or 6.35 mm TRS to dual 1/4" or 6.35 mm TS) is required to connect an effects unit to a channel insert. You can purchase an insert cable at your local music retailer
- Don’t connect an instrument or other audio source to the input using a standard 1/4" (6.35 mm) cable when a wireless transmitter is connected to the channel. This prevents audio from playing from both the wired and wireless source
Was this article helpful?
Thank you for your feedback!